Post title originally contributed by a faded blogger. Lol? Apologies. I took a little break from blogging, but now I have what I believe is a solid tutorial to share with you! Who wouldn’t appreciate some outdoor lights, right?
After years of postponement, we finally added outdoor lighting to our deck, and it looks fantastic. Not only is it super simple to do, but it’s also relatively low-cost! That’s why I’m here—to share my outdoor lighting secrets with you.
Required Supplies:
- A deck. This can also be a porch or patio? A surface with at least one wall?
- String lights. I suggest something with an industrial design for better durability.
- Fence posts (ours are originally 12 feet, trimmed down to 9 feet) I couldn’t find the exact model online, but I’ve linked to a shorter variant of what we purchased.
- Small carabiners for each attachment point on the house.
- Eye hooks to drill into the wall.
- S hooks for each pole.
- Cordless Drill.
- Hacksaw (for cutting the fence posts).
- Zip ties (similar style) that will match your poles.
Alright, first things first. You’ll need to decide on the arrangement of your lights. Do you want a zigzag pattern, or maybe a square around your area? It’s up to your preference! I’m sharing some not-so-great photos of the actual supplies I used.
There are various ways to attach the lights to the pole, but we chose to drill a tiny hole and insert the S Hook into it. It seems to be holding up well (just remember, there’s quite a bit of tension once they’re in place), so I believe it works!
After we drilled the holes into the poles and installed the S Hooks, we secured them to our deck railing. Since our railings are metal, we couldn’t drill into them. So, we decided on a zip tie solution, giving it a try with 18-inch industrial ties.
Once we trimmed the ends, they’re hardly noticeable on the railing. Totally worth it, even if you do catch a glimpse of them! 🙂
Then go ahead and use the eye hooks to drill into your house (it sounds scarier than it actually is!).
Attach the carabiner to the eye hook, and subsequently feed the light cord into the carabiner.
I recommend positioning the hook quite high—about 9 1/2 feet. It’s good to leave a little room for the string lights to “swoop,” plus you want to prevent anyone from bumping their heads.
Honestly, the trickiest aspect of the entire project is determining the lights’ arrangement. I only needed to relocate one hook after drilling it into the wall, and I wasn’t too bothered by it. People shouldn’t be scrutinizing your home walls anyway!
Here, you can see the transition from late afternoon to evening and then to night.
Va-Va-VOOM!
It’s been about 712 days since I last wrote a tutorial, so I apologize if I missed anything! You can check out the video version of this on Instagram; I’ve saved it in my stories. Best of luck!
<!–
–>
# Installing Outdoor Lighting: A Comprehensive Guide
Enhancing your home’s exterior with outdoor lighting not only improves its aesthetic appeal but also increases safety and usability. Whether you aim to illuminate pathways, accentuate landscaping, or add security measures, the key lies in appropriate installation. This guide will navigate you through the steps necessary for the secure and effective installation of outdoor lighting.
—
## **Step 1: Design Your Outdoor Lighting Layout**
Prior to purchasing lights or initiating installation, develop a lighting strategy. Consider these factors:
– **Purpose**: Are you in need of lighting for security, visual appeal, or utility?
– **Types of Lights**: Decide between pathway lights, spotlights, floodlights, string lights, or wall-mounted fixtures.
– **Power Source**: Will you opt for hardwired, solar, or low-voltage options?
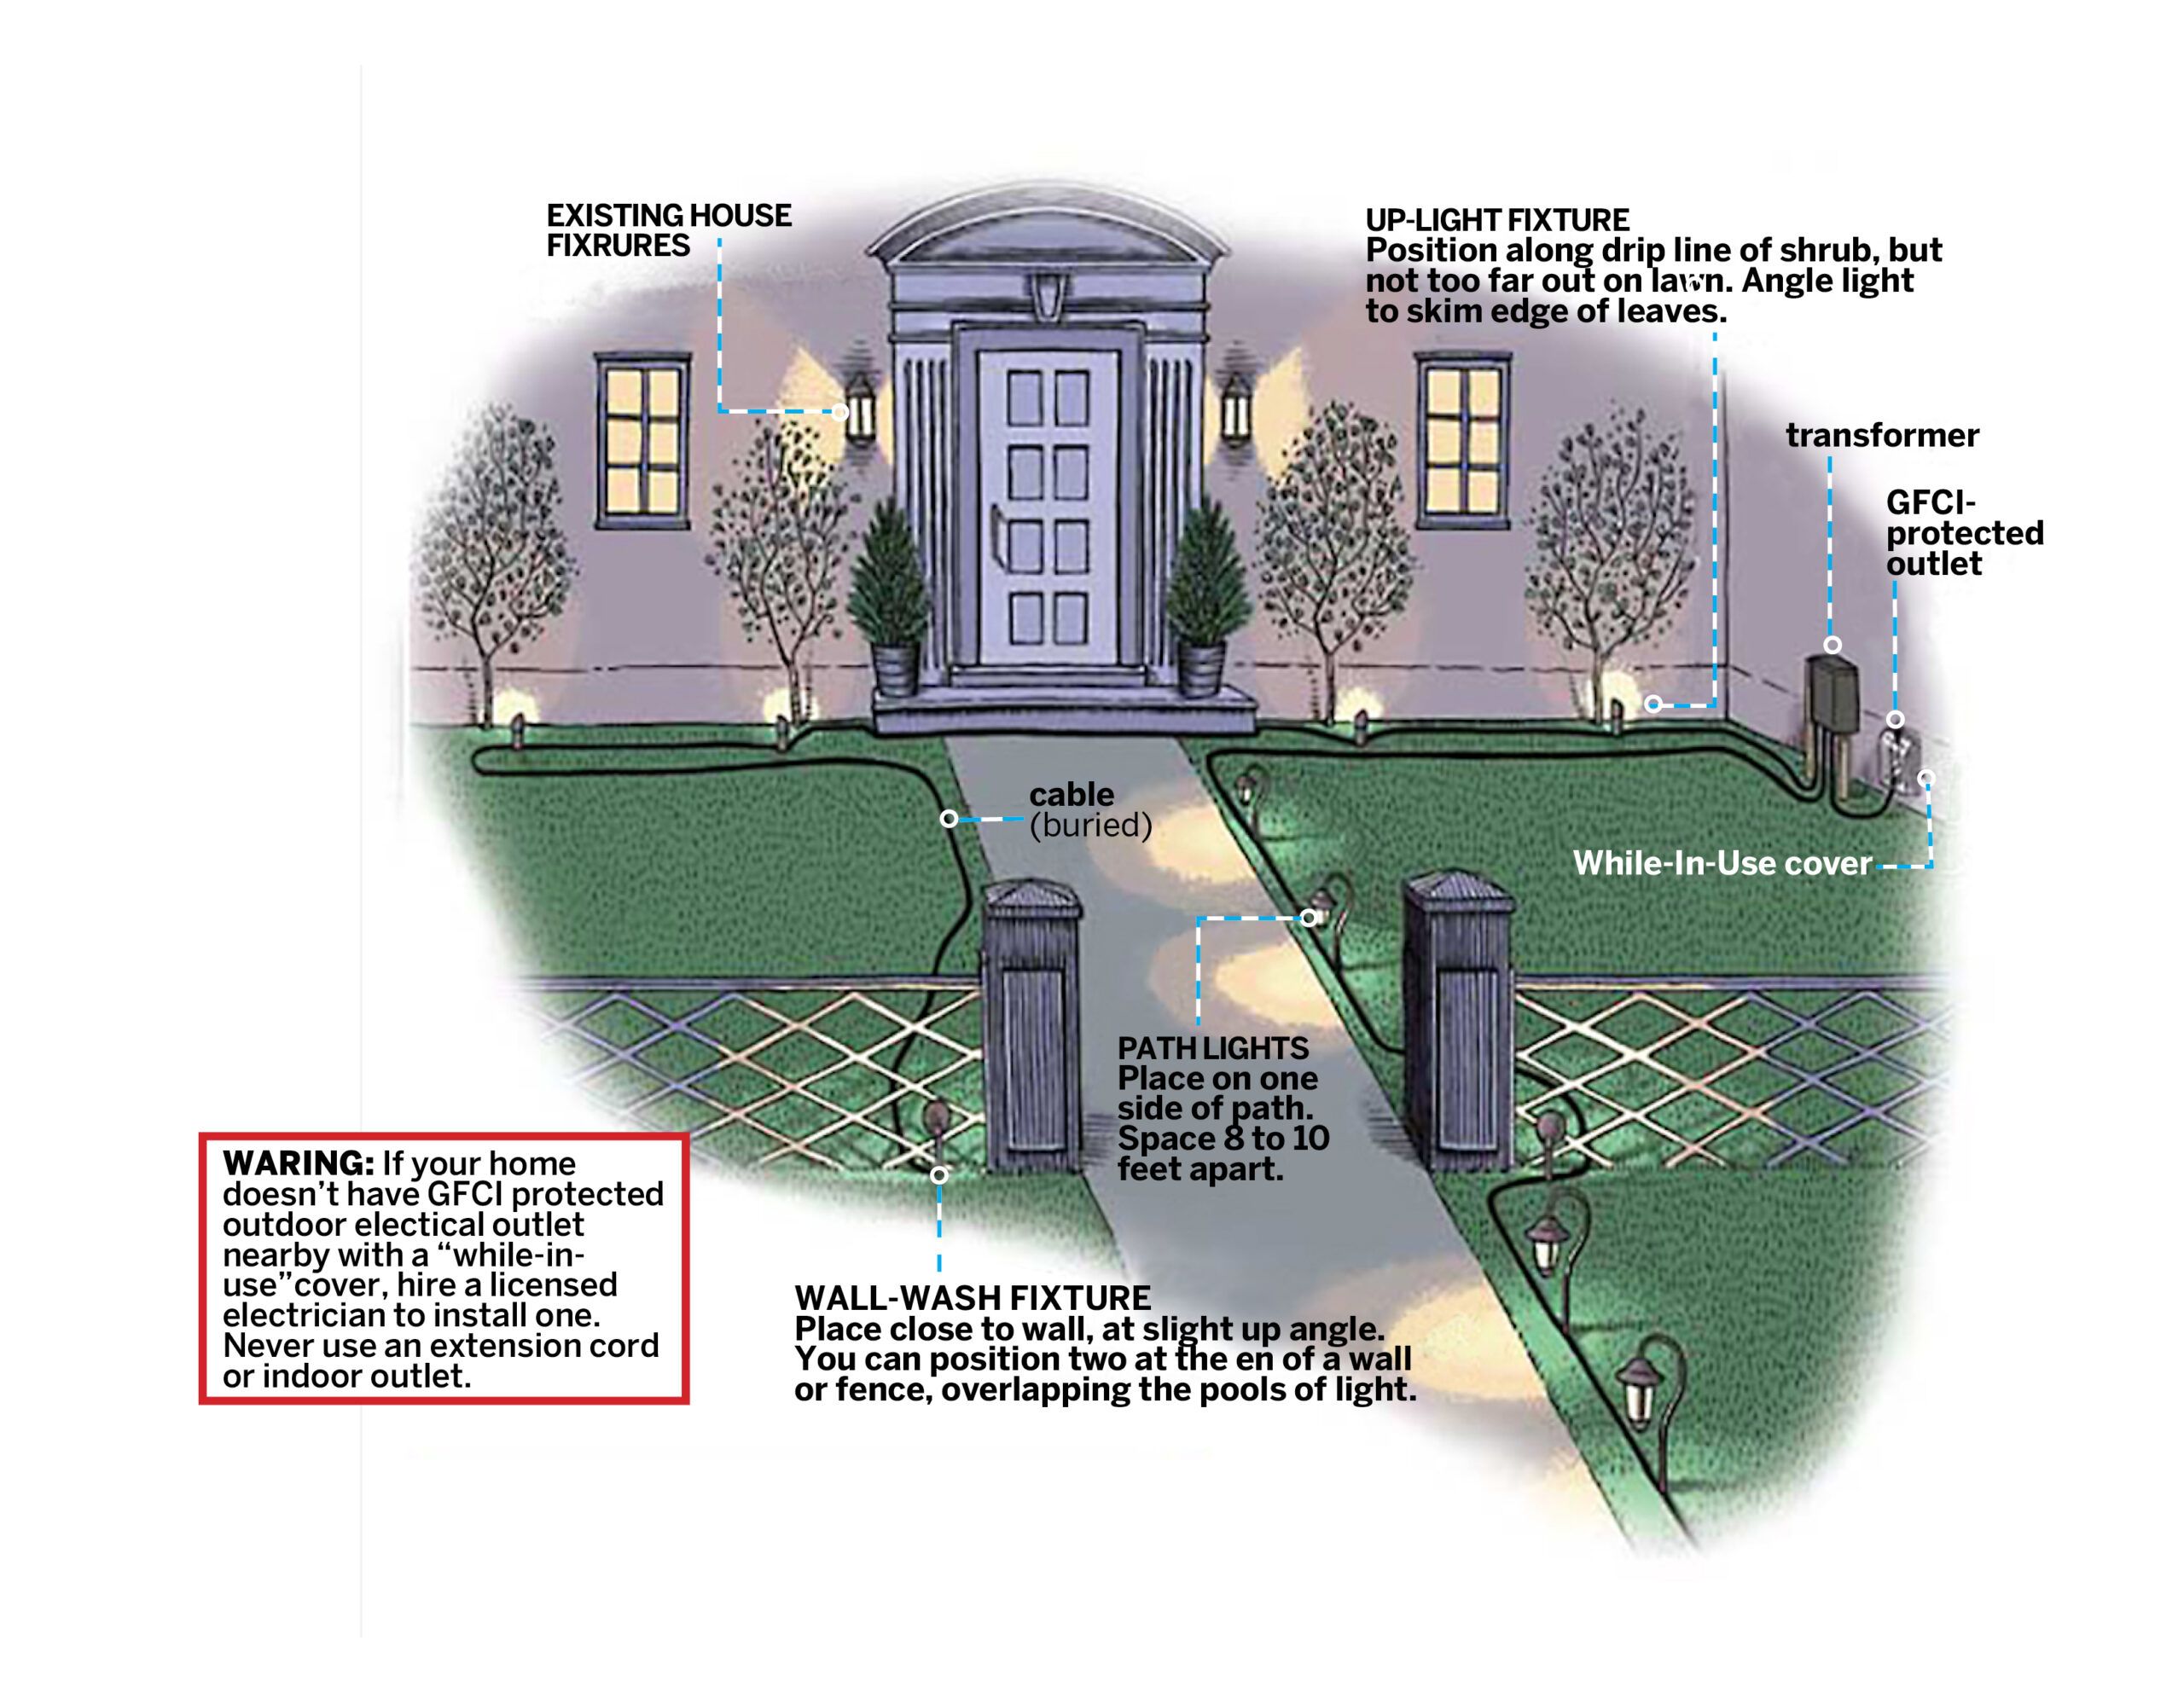
– **Placement**: Identify prominent locations such as walkways, driveways, patios, and garden beds.
—
## **Step 2: Select the Appropriate Outdoor Lights**
Pick fixtures that are designed for outdoor use and are weatherproof. Here are a few options:
– **Solar Lights**: Simple to install, energy-efficient, and perfect for pathways.
– **Low-Voltage Lights**: Require a transformer but deliver consistent illumination.
– **Hardwired Lights**: Best for permanent setups and necessitate electrical wiring.
– **Motion Sensor Lights**: Excellent for enhancing security and conserving energy.
—
## **Step 3: Assemble Tools and Materials**
Depending on the lighting type you choose, you might require:
– Outdoor-rated light fixtures
– Transformer (for low-voltage systems)
– Electrical wire and connectors
– Drill and screwdriver
– Wire strippers
– Shovel (for burying cables)
– Voltage tester (for safety checks)
—
## **Step 4: Set Up Low-Voltage Outdoor Lighting**
Low-voltage lights are a favored choice due to their safety and ease of installation. Here’s how:
### **1. Set Up the Transformer**
– Position it near an outdoor power source.
– Ensure it has adequate wattage for all connected lights.
### **2. Arrange the Wiring**
– Lay the low-voltage cable along your planned lighting route.
– Conceal the wire by tucking it under mulch or burying it slightly.
### **3. Connect the Fixtures**
– Attach each light fixture to the cable with the provided connectors.
– Distribute the lights evenly for a harmonious appearance.
### **4. Test the Setup**
– Activate the transformer to confirm that all lights are functioning.
– Modify fixture placements if necessary.
—
## **Step 5: Set Up Solar-Powered Outdoor Lights**
Solar lights are remarkably straightforward to install because they do not require any wiring.
### **1. Select a Sunny Spot**
– Position solar panels to receive direct sunlight for optimal charging.
### **2. Place the Lights**
– Insert stakes into the ground or mount fixtures as appropriate.
### **3. Allow for Charging**
– Let the lights charge for an entire day before testing them after dark.
—
## **Step 6: Configure Hardwired Outdoor Lighting**
For permanent fixtures like wall or porch lights, hardwiring is necessary. If electrical work isn’t your forte, consider hiring a licensed electrician.
### **1. Cut Power**
– Turn off the electrical supply at the breaker box to avoid hazards.
### **2. Install the Fixture**
– Fasten the light fixture to the wall or post with screws.
### **3. Connect the Wires**
– Align the wires (black to black, white to white, and ground to ground).
– Use wire nuts and electrical tape to secure the connections.
### **4. Restore Power and Test**
– Switch the power back on and ensure the light operates as intended.
—
## **Step 7: Adjust and Care for Your Outdoor Lighting**
– **Adjust Angles**: Ensure lights are correctly oriented for optimum brightness.
– **Clean Fixtures**: Wipe away dirt and grime to ensure maximum illumination.
– **Change Bulbs**: Opt for energy-efficient LED bulbs for durability.
– **Inspect Wiring**: Regularly check for damage or loose connections.
—
## **Concluding Remarks**
Setting up outdoor lighting not only boosts the curb appeal of your home but also enhances its safety. Whether you select solar, low-voltage, or hardwired options, following these instructions will lead to a successful installation. With proper lighting, you can create a beautifully lit outdoor environment for years ahead.
Would you like specific product recommendations for outdoor lighting? Share in the comments!