I put together this corkboard wall in just a few hours, so I’m excited to share the tutorial with you! The toughest part was worrying about whether it would adhere to the wall (spoiler alert—it did!). Let’s explore the starting point of this project.
This wall has had shelves for many years, but they weren’t serving me any longer. I absolutely adore traveling, so I wanted to showcase the various treasures I’ve gathered over time. Thus, the corkboard made its way in.
Since you need a robust adhesive for the cork roll, I was hesitant to attach it directly to the wall. We bought some affordable plywood, cut it to fit the wall, and secured it with screws. Don’t forget to create openings for any outlets on the wall!
This is where my husband took a back seat, and I came into play. The corkboard installation was solely my responsibility. It was primarily a solo venture except for the initial setup. I needed an extra pair of hands to help me align it properly, and then I was ready to go. Once you begin applying the cork to the roll, there’s no room for mistakes. Start in a corner and work your way down the wall.
I utilized a notch trowel to spread the adhesive on the wall and then rolled the cork over it using a rolling pin. I was apprehensive about bubbles, but the adhesive performed fantastically! No bubbles at all.
When I reached the wall’s edge, I used a sharp utility knife to cut along the edge of the wall. It was so sharp that it sliced right through the cork and into my thumb. Thankfully, a quick visit to the emergency clinic sorted it out!
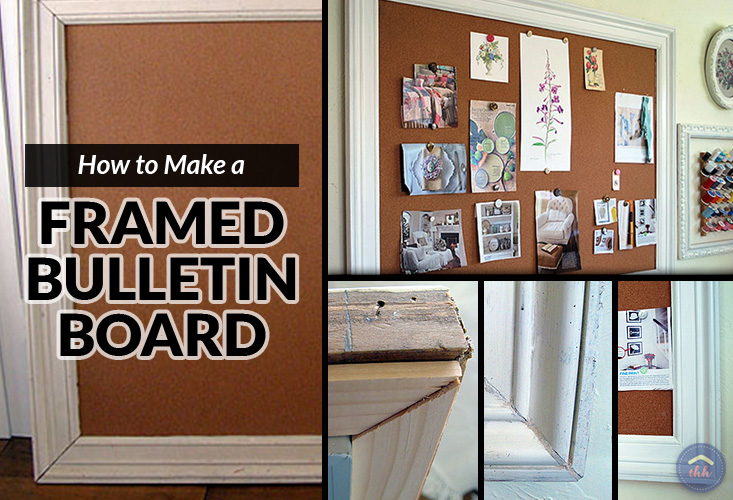
To complete the look, I painted a corner piece of trim to blend with the wall and applied a small bead of wood glue to secure it. Because the cork is thin enough, I simply placed it against my crown molding and baseboards. No one will ever realize it hasn’t been trimmed at the top and bottom, which saved me a lot of time!
Ready for your supply list? It’s brief and straightforward but crucial that you select the right materials.
Corkboard supply list
- Cork. I searched everywhere for the right roll. There are countless variations, but I wanted to avoid any seams. Thus, I ended up spending a bit more. I found cork rolls at Bangor Cork, where they offered the best price and a variety of options! I bought a roll and had it cut to 8 feet—the height of my ceilings. Seriously, it was worth the extra cost for that smooth appearance!
- Notch trowel. It doesn’t need to be a specific type—just one with teeth to spread the adhesive on the wall and give the cork something to stick to.
- Flooring Adhesive. This was the highlight of the project. It was forgiving enough to allow me a moment to adjust, but once it began to set, there was no shifting it! I was relieved because, as I mentioned earlier, I was anxious about how this would turn out. Cheers to not failing! 😉
- Utility Knife. If you’re interested in potentially cutting your thumb, I suggest this utility knife? I’m joking—kind of—but this knife is incredibly sharp. It did exactly what I needed!
- Rolling Pin. Another star of the show was my trusty old rolling pin. It simplified the process of smoothing out the cork.
After all those less-than-great iPhone photos, here’s a better one showcasing the finished corkboard wall.
I truly love it, and I hope the instructions were clear enough! If you’d like to see more of the completed corkboard wall, check it out here!
<!–
–>
# Step-by-Step Guide to Creating a Corkboard Wall
Adding a corkboard wall is a functional and chic enhancement to any home, office, or classroom. It acts as a handy area for securing notes, reminders, images, and artwork while also functioning as a decorative feature. Constructing a corkboard wall is a simple DIY endeavor that requires minimal tools and effort. This step-by-step guide will lead you through the process of setting up a corkboard wall effectively and efficiently.
## **Materials and Tools Needed**
Before you begin, gather the following materials and tools:
### **Materials:**
– Corkboard sheets or cork tiles
– Adhesive (corkboard adhesive, construction adhesive, or double-sided mounting tape)
– Screws or nails (optional for additional support)
– Wood trim (optional for framing)
– Paint or stain (optional for finishing the trim)
### **Tools:**
– Measuring tape
– Level
– Utility knife or scissors
– Pencil
– Roller or brush (for adhesive application)
– Sandpaper (if trimming cork to fit)
– Screwdriver or hammer (if utilizing screws or nails)
## **Step-by-Step Installation Guide**
### **Step 1: Select the Location**
Identify where you want to place the corkboard wall. Think about spots where you often need to pin notes, like a home office, kitchen, or study area. Ensure the wall is smooth and clean for optimal adhesion.
### **Step 2: Measure the Wall**
Utilize a measuring tape to ascertain the dimensions of the wall space designated for the corkboard. Mark the area with a pencil to guide your placement.
### **Step 3: Trim the Corkboard to Size**
If your corkboard sheets or tiles are oversized, use a utility knife or scissors to cut them down to the appropriate size. Sand the edges slightly for a more polished finish.
### **Step 4: Prepare the Wall**
Clean the wall surface to eliminate dust and debris. If the wall is uneven, contemplate adding a thin plywood backing to ensure a smooth surface for the corkboard.
### **Step 5: Apply Adhesive**
Depending on your chosen adhesive:
– **Corkboard adhesive or construction adhesive:** Generously apply to the back of the corkboard using a roller or brush.
– **Double-sided mounting tape:** Affix strips of tape along the edges and center of each corkboard piece to ensure strong adhesion.
### **Step 6: Attach the Corkboard to the Wall**
Carefully press the corkboard against the wall, aligning it with your marks. Use a level to verify it is straight. Apply firm pressure and hold for several minutes to allow the adhesive to bond.
### **Step 7: Secure with Screws or Nails (Optional)**
For extra stability, particularly for larger corkboard panels, use screws or nails to secure the corners and edges. This is especially beneficial in high-traffic areas.
### **Step 8: Install Trim (Optional)**
For a more finished appearance, add wood trim around the corkboard’s edges. Cut the trim to size, paint or stain it if desired, and attach it using nails or adhesive.
### **Step 9: Allow the Adhesive to Dry**
Give the adhesive ample time to dry completely before utilizing the corkboard. Check the manufacturer’s instructions for drying times, which usually vary from a few hours to overnight.
### **Step 10: Begin Using Your Corkboard Wall**
Once the adhesive has fully set, start pinning notes, photos, and reminders. Enjoy your brand new functional and stylish corkboard wall!
## **Tips for a Successful Installation**
– Opt for thicker corkboard (a minimum of ¼ inch) for improved durability and pin-holding capability.
– If using cork tiles, lay them out on the floor first to plan the arrangement before attaching them to the wall.
– Think about sealing the corkboard with a clear protective spray to enhance its longevity.
– If placing in a humid environment, utilize moisture-resistant adhesive to avoid warping.
## **Conclusion**
Setting up a corkboard wall is a straightforward and gratifying DIY project that boosts organization and creativity in any space. By following these easy steps, you can create a practical and visually appealing corkboard wall tailored to your needs. Whether for professional, educational, or personal use, a corkboard wall is a versatile addition that keeps vital information readily accessible.
Now that you understand how to install a corkboard wall, why not give it a shot? Enjoy your DIY experience!