I put up this corkboard wall in just a few hours, so I’m excited to share the tutorial with you! The most challenging part was worrying about whether it would adhere properly to the wall (spoiler: it did!). Let’s explore how it all started.
I’ve had shelves on this wall for many years, but they ceased to be useful for me. I absolutely adore travel, so I wanted to showcase the numerous treasures I’ve gathered over the years. Thus, the corkboard moved in.
Since a strong adhesive is required for the cork roll, I was reluctant to stick it directly to the wall. We bought some affordable plywood, cut it to match the wall’s dimensions, and secured it with screws. Remember to make openings for any outlets you have on that wall!
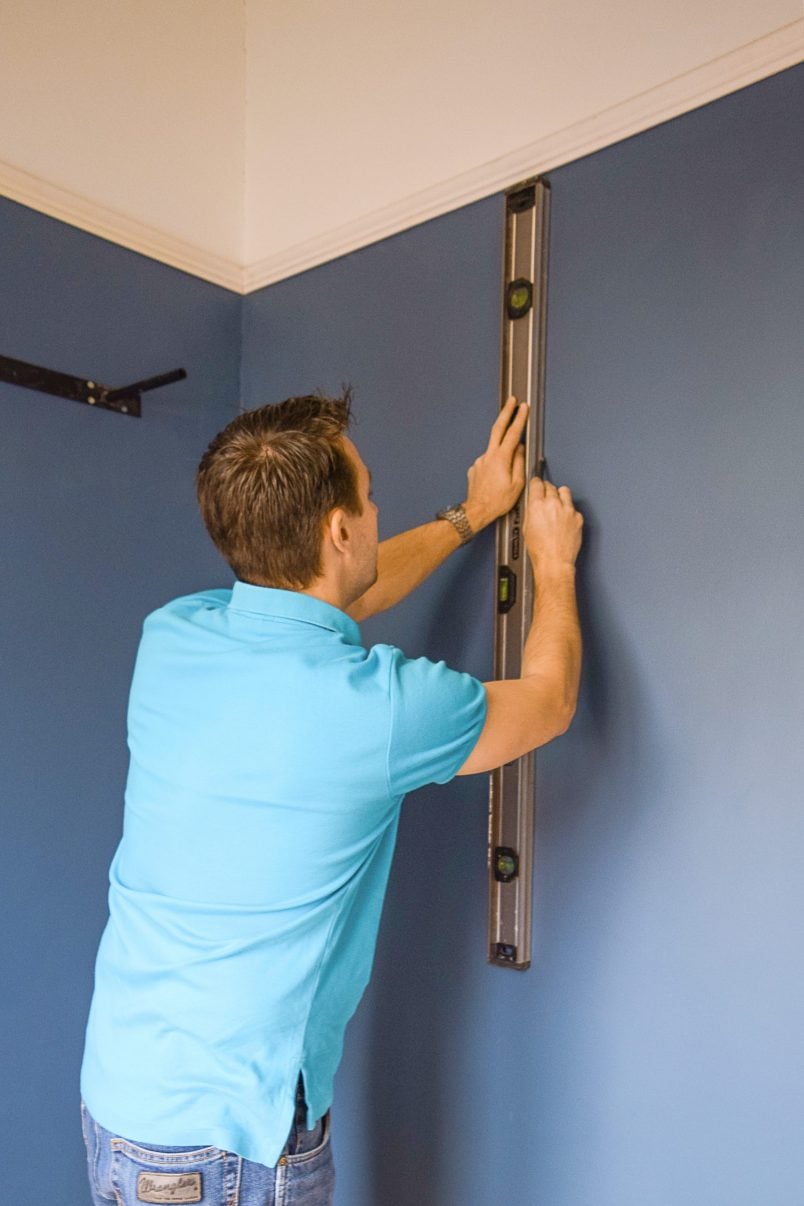
This is where my husband exited, and I took the stage. The corkboard task was mine. It was essentially a solo project except for the very start. I needed another pair of hands for alignment, and then I was off and running. Once you start applying the cork to the roll, there’s no room for mistake. So, be sure to start in a corner and work your way along the wall.
I utilized a notch trowel to spread the adhesive on the wall and then rolled the cork over it using a rolling pin. I was quite anxious about creating bubbles, but the adhesive worked wonders! No bubbles at all.
For the edge of the wall, I used a utility knife to slice along the wall’s edge. It was so sharp that it went straight through the cork and into my thumb. Thankfully, a quick visit to the emergency clinic took care of it!
To wrap it all up, I painted a corner piece of trim to match the wall and simply used a small amount of wood glue to adhere it. Since the cork is thin, I just fitted it against my crown molding and baseboards. Nobody would ever guess that it isn’t trimmed at the top and bottom edges, saving me a lot of time!
Alright. Are you ready for your supply list? It’s brief and straightforward—but it’s crucial that you use the correct materials.
Corkboard supply list
- Cork. I searched extensively for the right roll. There are many variations out there, but I wanted ZERO seams. Consequently, I spent a bit more. I found cork rolls at Bangor Cork. They offered the best price and a variety of options! I bought a roll and had it cut to 8 feet, which matched my ceiling height. Seriously—it was worth every extra cent because it looks so polished!
- Notch trowel. It doesn’t need to be anything special—just something with teeth to evenly spread the adhesive and help the cork stick.
- Flooring Adhesive. This was the highlight of the project. It allowed for slight adjustments, but once it set, it was immovable! I was relieved, as I was quite anxious this could turn out poorly. Hooray for success! 😉
- Utility Knife. If you’re aiming to slice your thumb, might I recommend this utility knife? I’m joking—mostly—but it’s incredibly sharp. It did exactly what I needed!
- Rolling Pin. My trusty old rolling pin was another star of the show. It made smoothing out the cork much simpler.
After all those mediocre iPhone photos, here’s a better picture to remind you of the completed corkboard wall.
I truly love it, and I hope the instructions were sufficiently clear! If you want to see more of the finished corkboard wall, go here!
<!–
–>
**Step-by-Step Guide to Installing a Corkboard Wall**
Constructing a corkboard wall is both a functional and fashionable method to organize your area, whether it’s in a workspace, school, or home setting. This guide will lead you through the steps to set up a corkboard wall, transforming your area into a practical place for pinning notes, images, and reminders.
**Materials Needed:**
– Corkboard sheets or rolls
– Measuring tape
– Pencil
– Level
– Utility knife
– Adhesive (special corkboard adhesive or strong spray adhesive)
– Paint roller or brush (for adhesive application)
– Sandpaper (optional, for wall smoothing)
– Straight edge or ruler
– Protective gloves
– Drop cloth or old sheet (to safeguard the floor)
**Step 1: Plan and Measure**
Start by determining the desired size and location for your corkboard wall. Utilize a measuring tape to gauge the dimensions of the area you wish to cover. Mark the top and bottom boundaries with a pencil for accurate placement.
**Step 2: Prepare the Wall**
Ensure the wall’s surface is clean, dry, and smooth. If needed, sand down any rough areas. This will facilitate a more effective adhesive bond. Place a drop cloth on the floor to protect it from adhesive spills.
**Step 3: Cut the Corkboard**
Based on your measurements, cut the corkboard sheets or rolls to the appropriate size using a utility knife. A straight edge or ruler will help achieve clean, straight cuts. Wear protective gloves to avoid injuries.
**Step 4: Apply Adhesive**
Refer to the instructions for your adhesive product. For corkboard adhesive, use a paint roller or brush to create a thin, even layer on both the wall and the back of the corkboard. If using spray adhesive, apply it evenly to both surfaces as well.
**Step 5: Install the Corkboard**
Carefully align the corkboard with your pencil marks on the wall. Firmly press it into place, starting at the top and moving downward to avoid bubbles. Utilize a level to confirm it is straight. Push down firmly across the entire area to secure it.
**Step 6: Seam and Finish**
When installing multiple sheets, align the edges closely to minimize visible seams. You can use a straight edge to ensure the seams are tightly pressed together. Allow the adhesive to cure according to the manufacturer’s guidelines.
**Step 7: Final Touches**
After the adhesive has set, check the corkboard for any loose edges and press them down. Trim any excess corkboard using a utility knife for a tidy finish. Your corkboard wall is now set for use.
**Maintenance Tips:**
– Regularly clean the corkboard using a soft brush or vacuum to eliminate dust.
– Avoid placing overly heavy items that could compromise the cork’s integrity.
– If the cork begins to wear, consider adding a fresh layer of corkboard over the existing one.
By following these steps, you can effectively set up a corkboard wall that enhances both the practicality and appearance of your space.